Tuesday, November 26, 2013

Mass Manufacturing the Parts

Today our team got down to business to finish making hundreds of parts for our 50 yo-yos. We started the day very early and planned on just powering through to make all our parts.

Sarah, really excited about all our parts

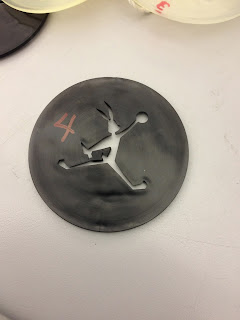
All of our Bugs Bunny disks

All the runners from the process


Widening out the shaft spacer


Die cutting all the basketball thermoforms

All the scrap material from the process

Punching out all the white disk parts


Sunday, November 17, 2013

Thermoform Optimization

The parameters for our thermoform part went through a lot of alterations. It was important to us to get good definition in the plastic from our mold so that the ring parts could fit around the basketball. To achieve this, we drilled extra vacuum holes in the mold around the basketball shape.


The finished thermoform mold, machined on the CNC mill. Notice the vacuum holes around the basketball.
Through testing the mold on the thermoform machine, we found that a high heat time also helped give the final thermoform part good definition. However, too much heat time left the plastic looking warped. We settled on a twenty second heat time.

The final parameters for our thermoform design.
The thermoformed plastic parts came out of the machine like this : 


Early thermoform part.
We then decided on a die size to use to cut out the part that would go into the yo-yo. We settled on a diameter of 2.072 inches.

Thermoformed part cut out using a die.
However, we weren't happy with the bubbles that would form on the face of the basketball. Dave theorized that dust on the unformed plastic sheets might be causing static electricity that lead to the bubbles. He also suggested we wipe the face of the mold as the plastic was being heated in the oven, in case the clamping process upset any dust on the machine and caused it to go onto the plastic.

During the final production run, we paid special attention to the cleanliness of the plastic and the mold, blowing the unformed plastic sheets with compressed air before putting them in the machine and softly brushing the mold off by hand while the plastic heated. This greatly reduced the amount of bubbles on the final part!

Thermoform part number 100. Awwwwww yeah


Tuesday, November 12, 2013

Final Part Optimization

Today our team worked on optimizing our new ring mold.
We had to change the mold because there was too much of an interference fit between the inner diameter of the outer ring and the outer diameter of the inner ring. However the fit of the ring around the basketball thermoform mold was perfect!

Our new ring design! Looks similar to the old ring, but has a larger outer diameter. The extra legs on the ring were added in order to be able to eject the part from the core mold.


To make the appropriate change, we had to make our cavity mold for the ring larger. We added .030" to the other diameter of the ring to make for a more snug fit. Our updated table of specifications can be downloaded here.

With all of our parts finally optimized, we were able to make a final yoyo!
Take a look at it in all it's glory.
Pretty beautiful if you ask us!

It also runs really well. We'll try and post some videos later.

Tuesday, November 5, 2013

Optimizing Injection Molding Parameters (other parts)


Previously, we talked specifically about the process through which we optimized the Bugs Bunny mold. In this post, we will run through the same process for all of our other parts. As before, we had to vary and experiment with many different parameters such as the cooling time, feed stroke length, injection speed profile, and injection hold pressure profile. In this post, we will focus on the path we took to optimize the Bugs Bunny mold.

Nathan, setting up the mold to make the rings


ORANGE RING
  1. We wanted to minimize shrinkage, so we increased the cooling time to 15 seconds.
  2. We decided that 15 seconds was too long, so we reduced it to 10 seconds. The fit was better, but still a little too tight. Our measurements at this stage were 2.235" for the outer diameter and 2.206" for the inner diameter.
  3. We decreased the cooling time to 5 seconds, but the runner got stuck in the mold resulting in a deformed part. 
  4. We increased the cooling time up to 7 seconds.
  5. We increased the cooling time up to 8 seconds. This allowed for the right fit in the body, so we kept the cooling time the same. However, the ring was not uniform in thickness throughout the body, so we had to shim the part.
  6. We shimmed the part with one piece of paper under the cavity for part 6.
  7. We added another piece of paper for part 7 and 8. 
  8. For part 9, we shifted the molds to get better centering by adjusting how the screws were tightened on the machine. 
Orange Ring finalized parameters

Measuring the thickness of the ring at different points of the ring

 RED RING
  1. First, we adjusted the set screw feed stroke down to 0.9 because we were seeing some flash in the parts.
  2. Next, we measured the radial thickness of the ring at different points and found that one side of the ring was consistently thicker than the other, which meant that the mold was off center. To fix this, we loosened the bolts holding the molds in place, pushed and held the mold in the compensation direction, and tightened the bolts again.
  3. #2 didn't work, so we turned the brass pins holding down to 0.235 in diameter to give us more tolerance to shift the mold around.
  4. We added dowel pins to prevent our part from getting stuck.
  5. The mold was still off center, so we shifted the mold a little more.
  6. Finally, we changed the cooling time from 8 seconds to 10 seconds to reduce shrinkage.
Red Ring Finalized Parameter

All the rings from our optimization!


Blog Deliverable 3- Bugs Bunny Part Process Optimization


During our optimization runs for injection molding our parts, we had to vary and experiment with many different parameters such as the cooling time, feed stroke length, injection speed profile, and injection hold pressure profile. In this post, we will focus on the path we took to optimize the Bugs Bunny mold.

Our finalized parameters can be read on the Injection Molding Parameters sheet seen here.

We arrived at these final parameters through iteration. We would modify one parameter, and then run a couple parts to see if it changed the final part.

For Bugs Bunny, our process began by:
  1. Parts 1-3 were made using the default parameters, using 5.632" ejector pins plus a 0.045" shim.
  2. Parts 4-5 modified the velocity profile to prevent bouncing of the parts.
  3. Part 6 modified the velocity profile to prevent bouncing again. Profile modified to: 4,4,3,2,1.7,1.4,1.2,1,0.7,0.2
  4. Part 7 changed the shot size to 1.1 to allow for more plastic to fill the narrow gap around Bug's carrot.
  5. Part 8 reduced the shot size to 1.
  6. Part 9-10 changed the shot size to 0.9 to prevent dishing of the part, that was seen at a shot size of 1.
One design flaw that we had was that the channel between Bug's tail and the carrot is pretty small. We should have made that passage wider, so that plastic could more easily flow into this area. Additionally, when the part was ejected from the machine, it was often bent resulting in a not flat part. 

If we could do this again, we'd probably design the part so that the plastic wasn't so thin in that area.

We also noticed that Bugs didn't appear to be centered on the disk. We stuck the part in the lathe, and found that the design was actually centered, but the cavity hole wasn't centered properly. 


We weren't really sure how this happened, but we made another part by facing the part in the lathe and then turning a new mold. We didn't end up changing the dimensions of the part at all though.

With the new mold, we ran some more trials on the machine.
  1. Parts 1-5: The part wasn't lying flat again, so we changed the cooling time to 10 seconds.
  2. Part 6: Changed the cooling time to 8 seconds, and the feed stroke to 1.0.
  3. Part 7 & 8: Utilized mold release, part came off really flat!